
- How to Install Convert Pro Addons?
- Understanding the General Settings of Convert Pro
- Understanding the Email Notification Settings in Convert Pro
- How to Create a Modal Popup in Convert Pro?
- Configuration Settings for a Modal Popup in Convert Pro
- How to Display a Call-to-action on a Specific Page, Post, Category etc (Page Level Targeting)?
- How to Target Users based on the Device they use?
- Schedule Your Call-to-action in Convert Pro
- What is a Call-to-Action in Convert Pro? How can I create one?
- Shortcut Keys For Customizer Operations
- Google Analytics Integration with Convert Pro
- How to Setup Convert Pro Events in Google Tag Manager
- Understanding the Email Notification Settings in Convert Pro
- How to A/B Test Two or More Call-to-Actions in Convert Pro?
- How to Add Custom CSS/HTML code/shortcode to a Call-to-action in Convert Pro?
- How to Create a Language Specific Popup in Convert Pro?
- Introduction to Rules sets in Launch settings of Convert Pro
- How to Integrate an Elementor Form in a Convert Pro call-to-action?
- How to display call-to-action based on URL parameter
- How to Set Cookie Name When a Particular Call-to-action is Submitted or Closed?
- Adding the Google reCaptcha form field in Convert Pro
- What is MX Record Validation For Email in advanced settings?
- How to Change the Slug of Popup? – Convert Pro
- How to Enable Form Field Validation?
- How to Add Dynamic Tag Support for the Autoresponder?
- Display Call-to-Action Inside the Post/Page Content
- Authorize Convert Pro to view Google Analytics 4 data
- How to Setup Convert Pro custom Events in Google Analytics 4 property
- Troubleshooting Guide: Google Analytics Integration
- How to Disable Click Event for a text?
- What are the Field actions in Convert Pro?
- Designing a Call-to-action in Convert Pro
- Cookie Settings in Convert Pro
- How to Create an Infobar in Convert Pro?
- How to Create a Full Screen Popup or Call-to-action in Convert Pro?
- How to Edit a Call-to-action in Mobile View?
- How can I disable a Call-to-action on Mobile Devices?
- How to Rename a Call-to-action in Convert Pro?
- How to Display a Call-to-action when a Specific Product is Added to the Cart?
- Working with Referrer Detection in Convert Pro
- Show or Hide Call-to-action to Logged in and First time users
- How can I disable a Call-to-action on Mobile Devices?
- How to Disable Google Fonts in the Frontend?
- How to Target Users based on the Device they use?
- Filter to Add a New Custom Font
- Convert Pro Email Notification Filters
- OttoKit Integration with Convert Pro
- Google Analytics Integration with Convert Pro
- How to Integrate Convert Pro with ActiveCampaign?
- How to Integrate Convert Pro with ConvertKit?
- How to Integrate Convert Pro with AWeber?
- How to Integrate Convert Pro with Benchmark Email?
- How to Integrate Convert Pro with Campaign Monitor?
- How to Integrate Convert Pro with Campayn?
- How to Integrate Convert Pro with CleverReach?
- How to Integrate Convert Pro with Constant Contact?
- How to Integrate Convert Pro with Drip?
- How to Integrate Convert Pro with GetResponse?
- How to Integrate Convert Pro with HubSpot?
- How to Integrate Convert Pro with iContact?
- How to Integrate Convert Pro with Infusionsoft?
- How to Integrate Convert Pro with Mad Mimi?
- How to Integrate Convert Pro with MailChimp?
- How to Integrate Convert Pro with MailerLite?
- How to Integrate Convert Pro with MailJet?
- How to Integrate Convert Pro with ONTRAPORT?
- How to Integrate Convert Pro with SendinBlue?
- How to Integrate Convert Pro with SendReach?
- How to Integrate Convert Pro with Sendy?
- How to Integrate Convert Pro with SimplyCast?
- How to Integrate Convert Pro with TotalSend?
- How to Setup Convert Pro Events in Google Tag Manager
- How to Integrate Convert Pro with Klaviyo?
- How to Integrate Convert Pro with Customer.io?
- How to Integrate Convert Pro with Mautic?
- How to Integrate Convert Pro with Mailgun?
- How to Integrate Convert Pro with VerticalResponse?
- How to Integrate Convert Pro with Mailster?
- How to Integrate Convert Pro with MailPoet?
- How to Integrate Convert Pro with Sendlane?
- How to get Mautic API Credentials?
- How to Integrate Convert Pro with ConvertFox?
- How to Integrate Convert Pro with Zapier?
- How to Integrate Convert Pro with ElasticEmail?
- How to Integrate Convert Pro with SendGrid?
- How to Integrate Convert Pro with Moosend?
- How to Integrate Convert Pro with MailWizz?
- How to Integrate MaxMind Geolocation in Convert Pro?
- How to Integrate Convert Pro with SendFox?
- How to Integrate Convert Pro with FluentCRM?
- Authorize Convert Pro to view Google Analytics 4 data
- How to Setup Convert Pro custom Events in Google Analytics 4 property
- Troubleshooting Guide: Google Analytics Integration
- How to Add a New Google Font?
- How to Add Custom Conditions to Display a Call-to-action?
- How to Change the Credit Link Text?
- How to Display a Call-to-action when a Specific Product is Added to the Cart?
- How to Trigger a Call-to-action only on Woo-commerce order received page?
- How to Use the Advanced Script Addon in Convert Pro?
- How to Clear Cache for Call-to-Actions in Convert Pro?
- How to Create a Language Specific Popup in Convert Pro?
- How to White Label Convert Pro?
- Authenticate your MailChimp Account
- Authenticate your Benchmark Email Account
- Authenticate your ActiveCampaign Account
- Authenticate your Campaign Monitor Account
- Authenticate Your CleverReach Account
- Authenticate Your ConvertKit Account
- Authenticate your GetResponse Account
- Authenticate Your MailerLite Account
- Drip API Token
- How to Trigger a Welcome Popup or Opt-in with Convert Pro?
- How to Trigger an After Scroll Call-to-Action with Convert Pro?
- How to Trigger a Popup when a User is About to Leave the Page (Exit Intent)?
- How to Trigger a Call-to-action only on Woo-commerce order received page?
- How to Trigger a Popup on User Inactivity (User Inactivity Trigger)?
- How to Trigger a Popup or Call-to-action on Click of an Element/Button?
- Trigger a Call-to-Action using a Link Code
- Trigger a Call-to-Action using a Unique CSS class or ID (Button and WordPress Menu Item)
- How to Trigger a Call-to-Action after a Blog Post?
How to Setup Convert Pro Events in Google Tag Manager
Convert Pro offers seamless integration with Google Analytics. Therefore, if you have already added the Google Analytics code to your website, your Convert Pro events will automatically be tracked by Google Analytics.
But, if you are using Google Tag Manager, then you need to make following changes to track Convert Pro events in Google Analytics.
- Login to your Google Tag Manager Account
- Create New Custom Variables for Convert Pro Google Analytics Events
- Create Generic Event Tag & CONVERTPRO Trigger
- Enable Google Tag Manager Support in Convert Pro WordPress Dashboard
- Verify the Convert Pro events in Google Analytics
1. Login to Google Tag Manager
Firstly, you’ll need to access your Google Tag Manager account.
2. Create New Custom Variables for Convert Pro Google Analytics Events
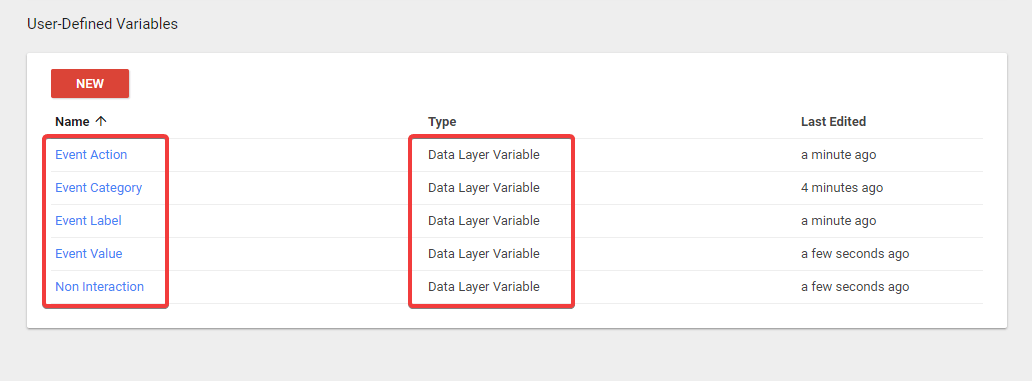
We begin by creating the first Data Layer Variable – Event Action as shown below.
- Navigate to “Variables.”
- Click on “New” under User-Defined Variables.

- Select variable type as Data Layer Variable

Create the following variables one by one:
Variable Name: Event Action
Data Layer Variable Name: eventAction
Variable Name: Event Category
Data Layer Variable Name: eventCategory
Variable Name: Event Label
Data Layer Variable Name: eventLabel
Variable Name: Event Value
Data Layer Variable Name: eventValue
Variable Name: Non-Interaction
Data Layer Variable Name: nonInteraction
Once all 5 variables are created, it should look as shown below.
3. Create Generic Event Tag & CONVERTPRO Trigger
With the 5 new variables, you are ready to create your new event tracking tag. Follow the steps mentioned below to create new Generic Event tag and CONVERTPRO trigger to track events.
You can also follow the steps written below.
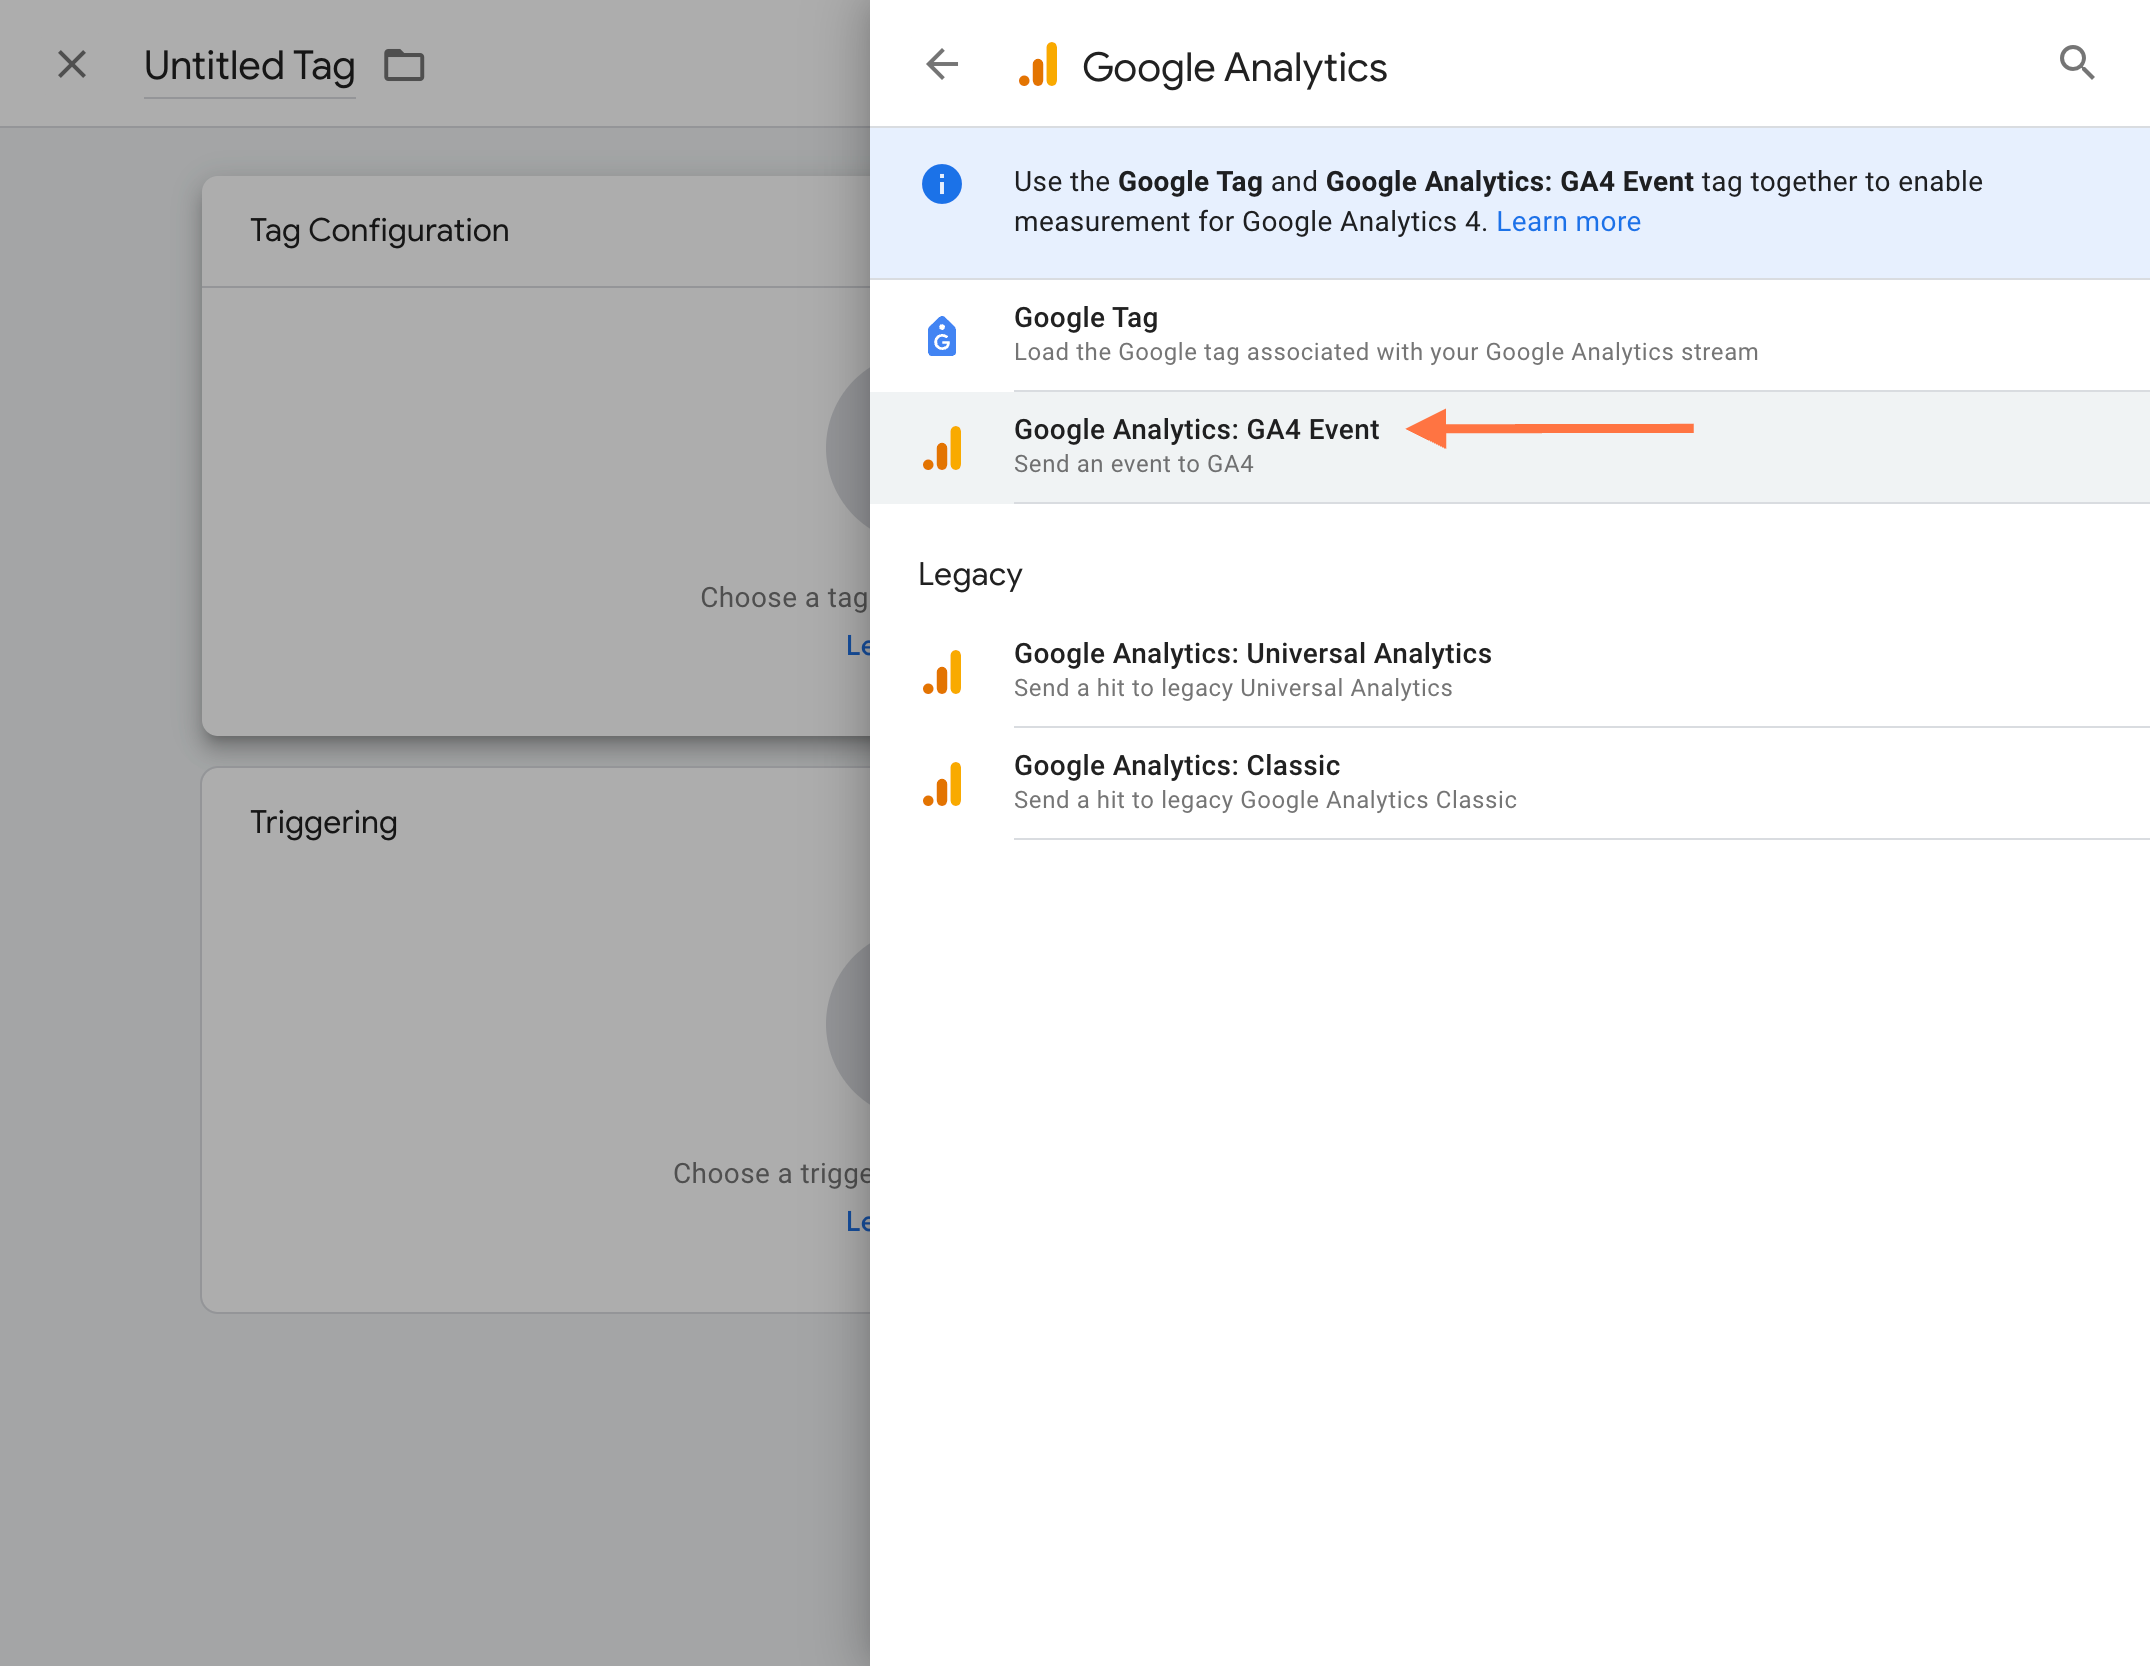
Create a New Generic Event Tag
- Click on “Add a New Tag.”

- Name the Tag as “Generic Event.”
- Select Tag Type as “Google Analytics: GA4 Event.”

- Configure the tag with the following Event Parameters:
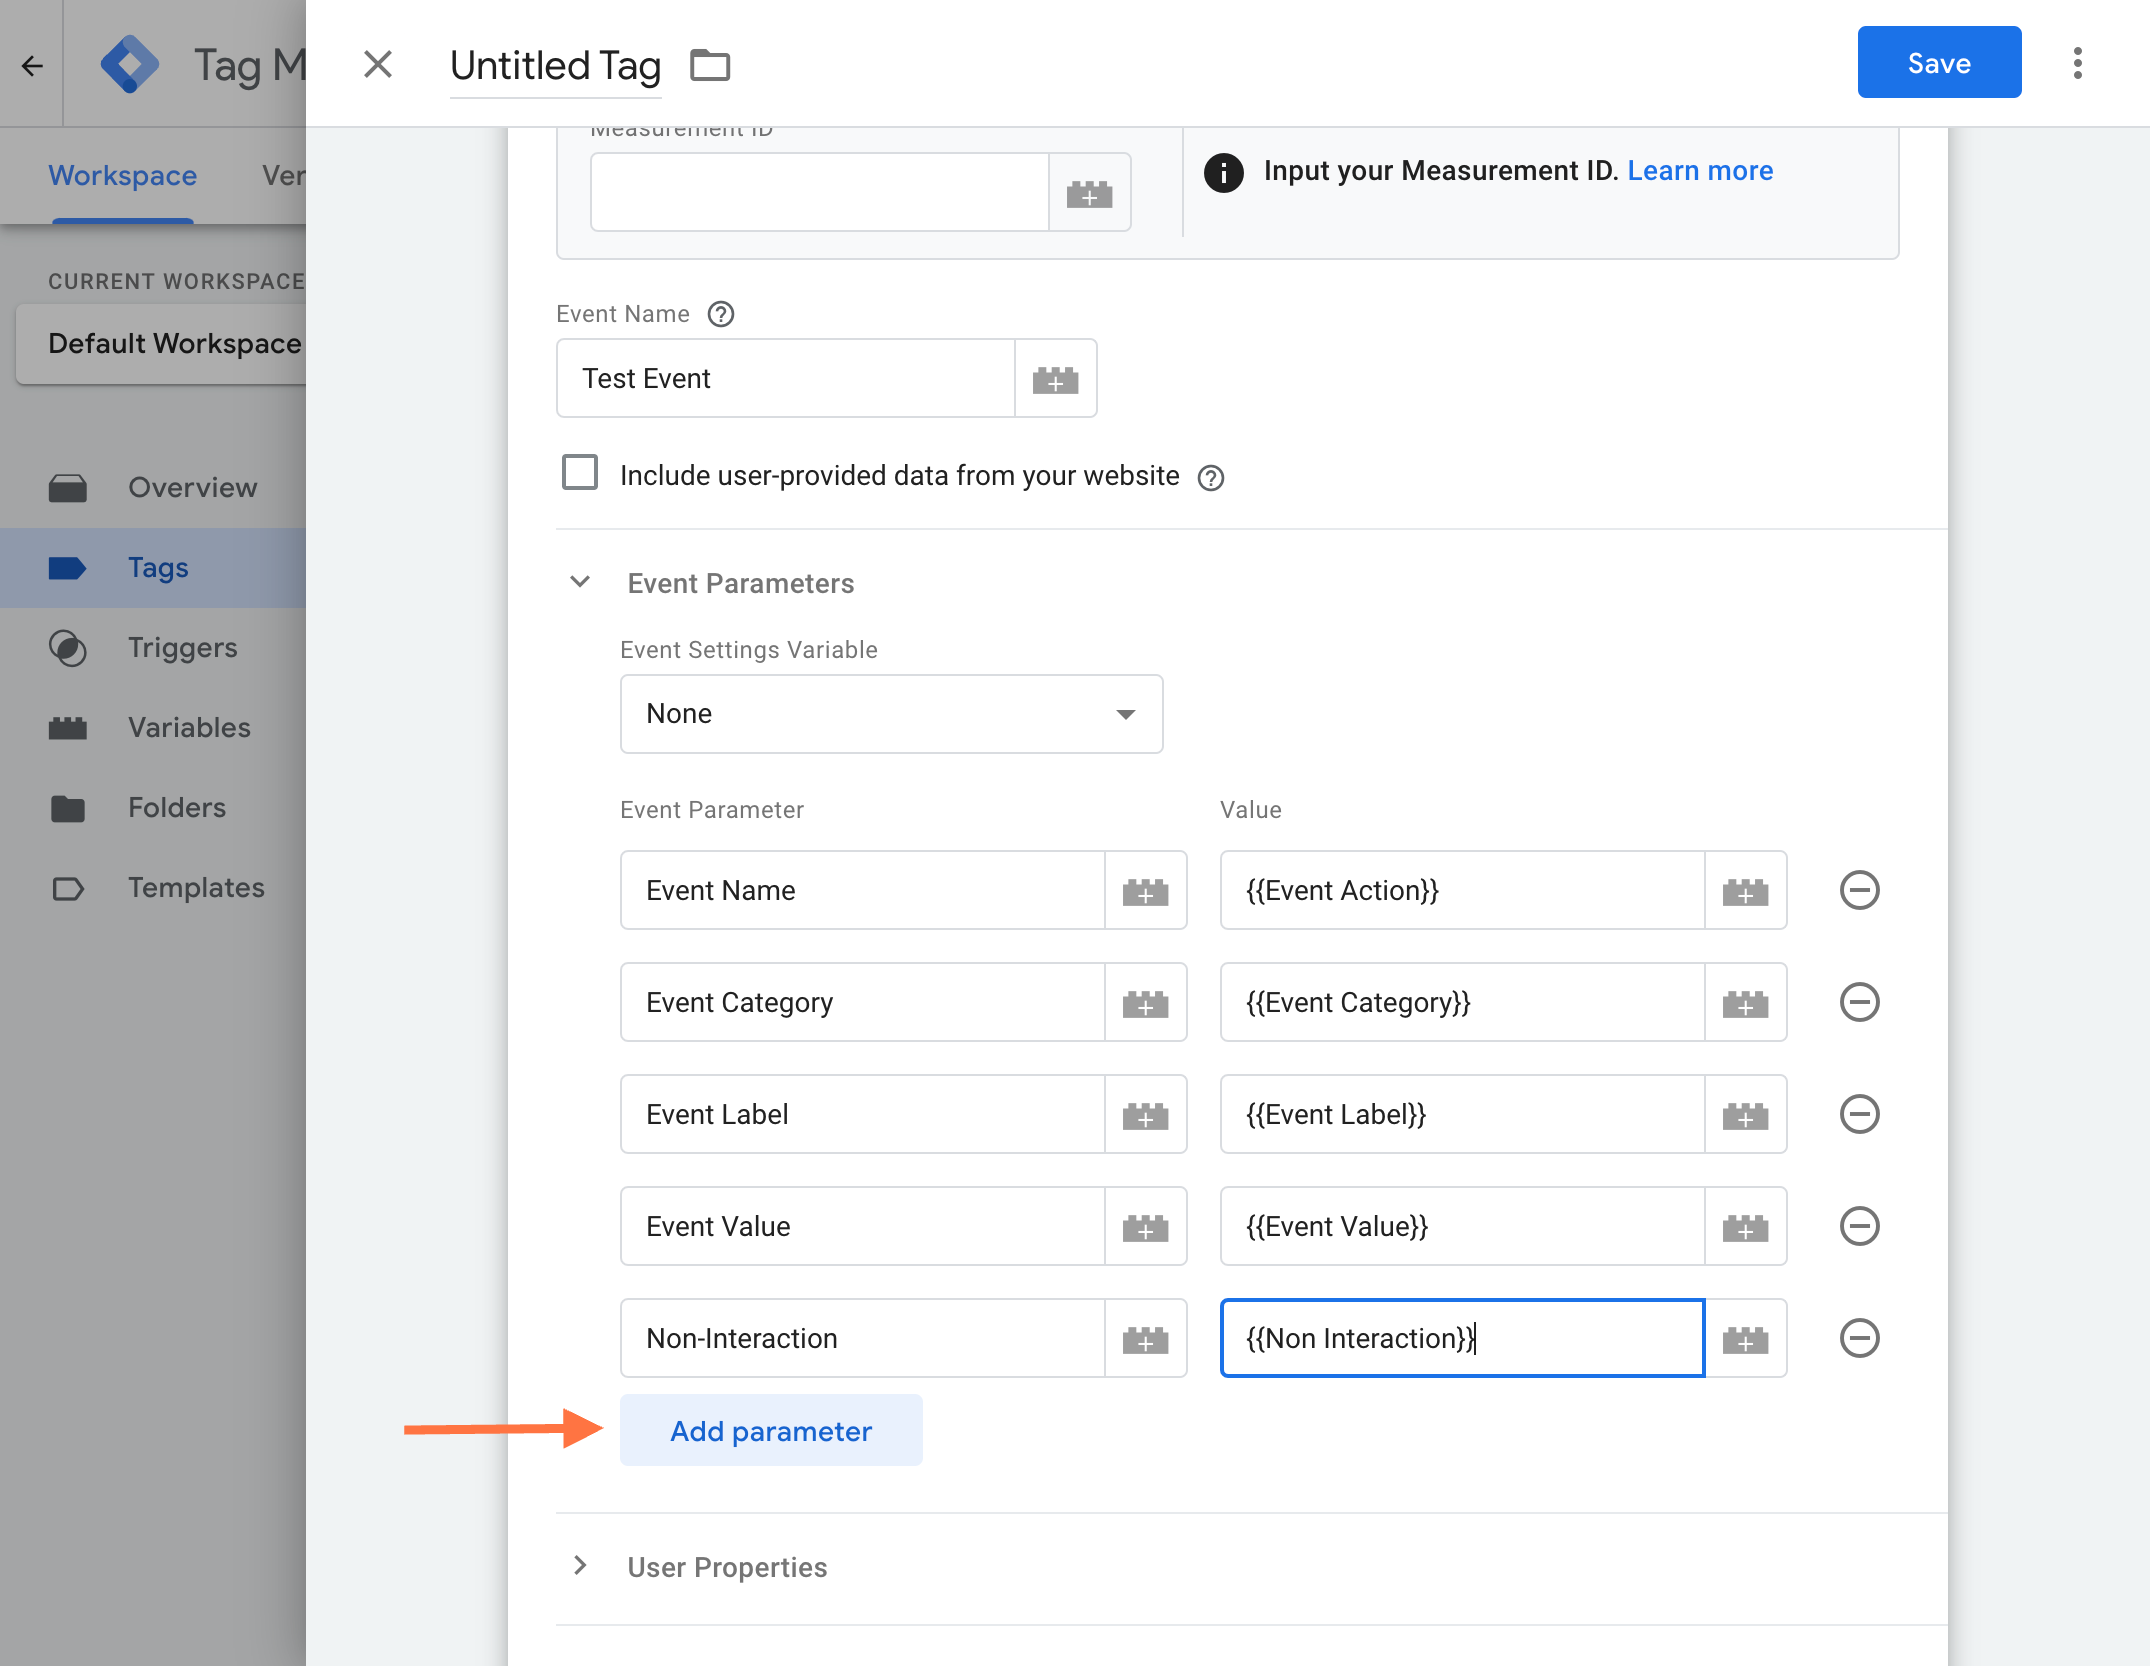
- Set the Google Analytics Settings variable.
- Enter your Measurement ID.
- Save the Tag.
Create Trigger for Convert Pro Events:
- Click on “Triggering.”

- Click on the plus (+) sign to create a new trigger.

- Name the trigger as “Convert Pro Events.”
- Select the trigger type as “Custom Event.”

- Set the Event name as “CONVERTPRO”
- Save the Trigger.
Publish Changes:
Save and publish the changes in Google Tag Manager.
4. Enable Google Tag Manager Support in Convert Pro WordPress Dashboard
Open your Convert Pro dashboard by logging into your website.
- Click on “Settings” in the Convert Pro Dashboard.
- Click on “Addons”.
- Select Analytics Addon – Install and Activate it.
- Click on “Analytics”.
- Select Authorization Type as “Already Added Google Tag Manager Code”.
- Save the Settings.

We have an article where you can read more about Convert Pro’s integration with Google Analytics
5. Verify the Convert Pro events in Google Analytics
After all the settings are done, fill in the dummy data in your current pop-ups and submit them to see the event in Google Analytics. You can see the events under the REAL-TIME tab in Google Analytics.

You have successfully configured Convert Pro events in Google Tag Manager.
Note: To enable the “anonymize IP” option for Google Analytics using Google Tag Manager, you need to specify the following for every tag you add.
We don't respond to the article feedback, we use it to improve our support content.

