No results found. Try again with different words?
Search must be at least 3 characters.
- How to deliver a lead magnet through your confirmation page or thank you page? – Using Double Opt-in
- How to Create a Full screen popup in Convert Pro?
- How to Disable Call-to-actions for Subscribers?
- Introducing the Honeypot field in Convert Pro
- Disable cookies using Cookiebot plugin with Convert Pro for GDPR regulations
- How to create Multilingual call-to-action with WPML
- How to Display a YouTube Video in a Convert Pro Call-to-Action?
- Convert Pro Supports GDPR Regulations
- How to auto close call-to-action in Convert Pro
- How to Trigger Convert Pro Popup based on Page Visits?
- How to Show a Call-to-action to Users who have Subscribed through Particular Call-to-action?
- How to Show or Hide a Call-to-action only after a User has seen a specific Call-to-action in Convert Pro?
- How to Trigger a Popup when a particular Cookie is set?
- How Can I Create an Ad Block Detection Popup with Convert Pro?
- Schedule Your Call-to-action in Convert Pro
- Trigger a call-to-action when a Class or ID appear in Viewport
- How to Trigger a Call-to-action after few seconds?
- How to Trigger a Call-to-Action after a Blog Post?
- Troubleshooting Guide: Google Analytics Integration
- How to Setup Convert Pro custom Events in Google Analytics 4 property
- Authorize Convert Pro to view Google Analytics 4 data
- Display Call-to-Action Inside the Post/Page Content
- How to Add Dynamic Tag Support for the Autoresponder?
- How to Enable Form Field Validation?
- How to Change the Slug of Popup? – Convert Pro
- What is MX Record Validation For Email in advanced settings?
- Adding the Google reCaptcha form field in Convert Pro
- How to Set Cookie Name When a Particular Call-to-action is Submitted or Closed?
- How to display call-to-action based on URL parameter
- Introduction to Rules sets in Launch settings of Convert Pro
- How to Integrate an Elementor Form in a Convert Pro call-to-action?
- How to Create a Language Specific Popup in Convert Pro?
- How to A/B Test Two or More Call-to-Actions in Convert Pro?
- How to Add Custom CSS/HTML code/shortcode to a Call-to-action in Convert Pro?
- Understanding the Email Notification Settings in Convert Pro
- How to Setup Convert Pro Events in Google Tag Manager
- Google Analytics Integration with Convert Pro
- Shortcut Keys For Customizer Operations
- How to Set Cookie Name When a Particular Call-to-action is Submitted or Closed?
- How to deliver a lead magnet through your confirmation page or thank you page? – Using Double Opt-in
- How to Show or Hide a Call-to-action only after a User has seen a specific Call-to-action in Convert Pro?
- Where can I find the ID (style ID) of the call-to-action in Convert Pro?
- How to Trigger a Popup when a particular Cookie is set?
- Convert Pro Supports GDPR Regulations
- How to Disable Google Fonts in the Frontend?
- How to Track Users Depending on their Location or Country? (Geo Location or GeoIP Tracking)
- How to Offer Downloadable Files or Lead Magnets after Successful Form Submission?
- Convert Pro Email Notification Filters
- Filter to Add a New Custom Font
- How to Target Users based on the Device they use?
- How to Disable Google Fonts in the Frontend?
- How can I disable a Call-to-action on Mobile Devices?
- Show or Hide Call-to-action to Logged in and First time users
- Working with Referrer Detection in Convert Pro
- How to Display a Call-to-action when a Specific Product is Added to the Cart?
- Troubleshooting Guide: Google Analytics Integration
- How to Setup Convert Pro custom Events in Google Analytics 4 property
- Authorize Convert Pro to view Google Analytics 4 data
- How to Integrate Convert Pro with FluentCRM?
- How to Integrate Convert Pro with SendFox?
- How to Integrate MaxMind Geolocation in Convert Pro?
- How to Integrate Convert Pro with MailWizz?
- How to Integrate Convert Pro with Moosend?
- How to Integrate Convert Pro with SendGrid?
- Filter to Add a New Custom Font
- How to Pass Current Page URL as a Value to Hidden Field of the Form?
- How to White Label Convert Pro?
- How to Create a Language Specific Popup in Convert Pro?
- How to Clear Cache for Call-to-Actions in Convert Pro?
- How to Use the Advanced Script Addon in Convert Pro?
- How to Trigger a Call-to-action only on Woo-commerce order received page?
- How to Display a Call-to-action when a Specific Product is Added to the Cart?
- How to Add Custom Conditions to Display a Call-to-action?
How to Add Dynamic Tag Support for the Autoresponder?
Convert Pro now provides the feature to dynamically add the autoresponders tags based upon the user’s selection, even more efficiently with your choice of the autoresponder.
We have provided this feature for the following mailers:
- MailChimp
- ActiveCampaign
- FluentCRM
- GetResponse.
- ConvertKit
Before diving further into this feature:
- Make sure you have the Convert Pro 1.6.0 and Convert Pro addon 1.5.4 and above
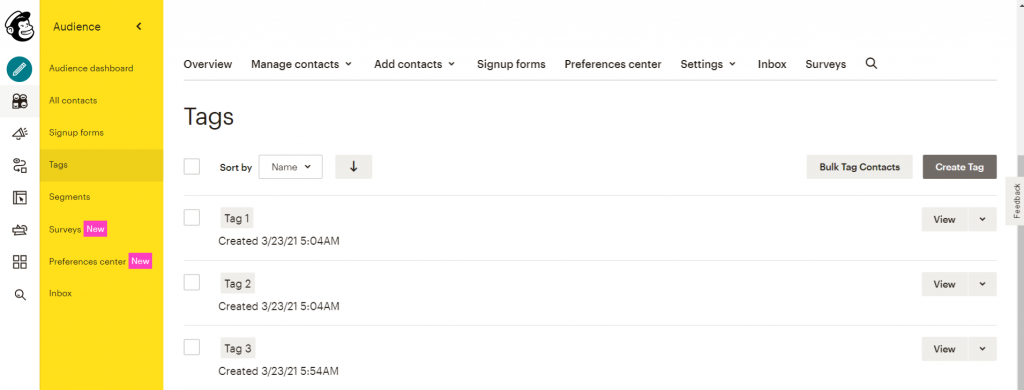
- Please make sure that the autoresponder you connect to the Call-to-Actions should have tags created in it.
Ex.: If you are using MailChimp Email Marketing Software, then make sure in your MailChimp lists, Tags should be created.
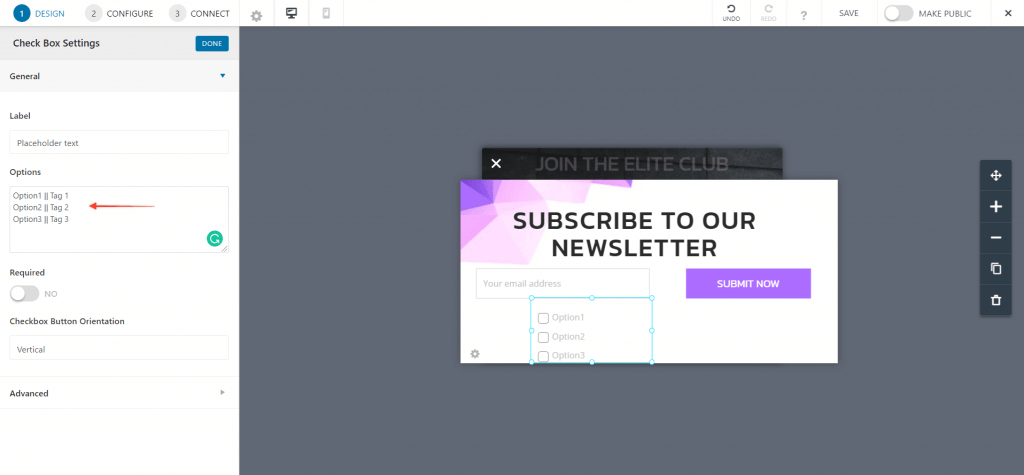
- Add “Checkbox”, “Radio”, or “Dropdown” form elements and you assign an individual tag name to it by using the delimiter ( || ). So that subscribers have a way of choosing an answer.
Let’s quickly see the steps to add them —
Step 1: Add the Checkbox in the CTA.
Step 2: Create the tags in Autoresponder, let’s say Mailchimp

Note: Please note that tag names are case-sensitive.
Step 3: Add the tags in the Checkbox with the help of delimiter ( || ).
Ex.: Option 1 || Tag 1

Step 4: Save the settings and You’re Done.
Now visit the site and submit the form and select any options, if you choose option 1 then the associated tag 1 will be assigned to the user.
After you submit the information, check your autoresponder for the subscriber, if everything works as it should, the tag corresponding to the answer selected will be added to the information of the subscriber.
Hopefully, this article was useful for you. 🙂
We don't respond to the article feedback, we use it to improve our support content.

